

Hiring outdoor kitchen builders is not the same as buying a grill. You are paying someone to combine gas, power, water, masonry, and metal in a space that faces rain, sun, and frost.
That mix explains why two quotes for the “same” kitchen can land thousands apart. This guide covers what these pros do, what the work costs, and how to check one out before you sign.
The prices come from Fixr, HomeStars, and an Angi average quoted by This Old House. They are averages, not promises, and we point out where the sources disagree.
What a good builder actually does
Most people picture someone who stacks a grill island and leaves. The real job is wider, and it starts well before any stone is cut.
A good pro measures the site, checks slope and drainage, and helps you settle a layout. They plan where gas, water, and electric lines will run, and they handle or coordinate the permit paperwork.
Then comes the build itself. That means a base, a frame, cladding, countertops, appliance cutouts, and the utility hookups.
The last stage is testing and handover. Gas connections get leak-checked, outlets get tested, and you should leave knowing how to winterize the plumbing.
Notice how much of that is coordination. A big part of what you pay for is the order of operations: which trade shows up when, and who answers for each step.
The kinds of pros you will meet
The label is loose. Several types of businesses sell the same finished result, and each comes with trade-offs.
Design-build outdoor living firms handle design, permits, and construction under one contract. You get a single point of contact, though the price often reflects that convenience.
Landscape contractors are common for patios, walls and pergolas, and many add kitchens. Ask how many gas and electrical jobs they have done, and who actually performs that work.
Masons and hardscape crews are strong on stone, brick, and stucco bases. They may subcontract the utilities, so ask who holds the licenses.
General contractors suit larger projects tied to a patio, a roof, or an addition. If your kitchen is part of a bigger home addition, one team in charge keeps things simple.
Dealers who install prefab islands deliver and set a ready-made unit. It is a lighter job, and Fixr’s low-end figure of 1,400 dollars describes a small pre-made island with cabinets and a grill.
Whatever type you pick, the licensed trades matter more than the logo on the truck. Fixr advises using a licensed contractor for any gas, electrical or plumbing work.
What an outdoor kitchen costs
Start with the headline numbers. Fixr puts the average at about 16,000 dollars, with a typical range of 6,000 to 30,000 dollars.
This Old House cites an Angi average of 16,145 dollars, which lines up closely. HomeStars describes a basic kitchen at 2,000 to 10,000 dollars and a luxury build at 50,000 to 100,000 dollars.
| Source | What it reports | Figure (dollars) |
|---|---|---|
| Fixr | Average and typical range | About 16,000; 6,000 to 30,000 |
| Fixr | Low end and high end | 1,400 (small pre-made island); 65,000+ (custom luxury) |
| Fixr | Cost per square foot | About 75 average; 40 to 130 |
| Angi, quoted by This Old House | Average | 16,145 |
| HomeStars | Basic kitchen | 2,000 to 10,000 |
| HomeStars | Luxury kitchen | 50,000 to 100,000 |
Two cautions apply. HomeStars does not state a currency, and the site appears to serve Canada, so use its numbers as a rough guide for a US budget.
Also, every page calls its figures averages. Real quotes can run well above or below them.
Fixr also breaks the money into parts, which is more useful when you compare bids.
| Component | Fixr range (dollars) |
|---|---|
| Cabinets and framing | 100 to 300 per linear foot installed |
| Countertops | 10 to 190 per linear foot; about 4,000 total for roughly 20 linear feet |
| Appliances | 1,500 to 7,000 typical; about 4,000 average |
| Plumbing | 300 to 1,500 typical; about 500 average |
| Electrical run | About 500 average |
| Permits | 150 to 500 in most municipalities |
Labor is the line people forget. Fixr says it is about half of the total, within a 30 to 70 percent range, and often near 8,000 dollars.
Why quotes vary so much
Size is only part of the story. A handful of choices move the price more than anything else.
Distance from the house. HomeStars notes that a spot farther into the yard needs new utility lines, while one near the house may avoid them.
An existing patio. If you already have a sound base, you skip the cost of building one.
Appliances. Fixr lists grills from 300 to 5,000 dollars and up, pizza ovens from 2,000 to 14,000, and refrigerators from 175 to 3,000.
Countertop material. Fixr’s per-square-foot ranges run from 4 to 45 dollars for tile to 70 to 140 for granite.
Cover. Fixr prices pergolas at 1,500 to 15,000 dollars and permanent awnings at 500 to 2,000.
Site work. Slope, drainage, and the distance to gas, water, and power all change the labor.
Use this list to compare bids line by line instead of by total. A low total often hides a missing line, such as utilities or permit fees.
Where to find reputable builders
Start with people, not search results. Neighbors, friends, and local landscape or masonry suppliers can tell you who finishes on time and returns calls.
Look at finished work in your own area. Soil, frost, and local code all shape a build, so a project a few towns away may not tell you much.
Frost matters more than most people expect. This Old House warns that tile grout can be damaged by freezing and thawing, so ask what a pro would use in your climate.
Then widen the list. Your state or local licensing board can confirm a contractor’s license, and your building department can tell you which trades need permits.
Review sites help you build a shortlist. Treat star ratings as a starting point, and read the middle reviews, which often show how a company handles problems.
Aim to collect bids from three outdoor kitchen builders. One bid gives you nothing to compare, and six becomes hard to manage.
We are not ranking or recommending specific companies here. No list can know your zip code, your budget, or a firm’s current workload.
How to vet a builder before you sign
Vetting takes a few evenings and can save you from the worst outcomes. Work through these checks in order.
License. Ask for the license number and confirm it with your state or local board. Rules differ by state, but gas, electrical, and plumbing work generally call for licensed trades.
Insurance. Ask for a certificate of liability insurance, and have it sent directly from the insurer. Ask what covers workers on your property, and check what your state requires.
References. Ask for two or three recent clients with a job like yours, then call them. Ask whether the project stayed on budget, how changes were handled, and whether the crew cleaned up.
Portfolio. Look for projects similar in size and materials. If you can, visit one finished kitchen that is at least a year old.
Permits. Ask who pulls them and whether fees are in the quote. Fixr puts permits at 150 to 500 dollars in most municipalities.
Subcontractors. Ask who handles gas, electrical, and plumbing, and who will be on site day to day. A name and a license number beat a general promise.
A real written bid. It should be itemized, dated, and specific about brands and models. A one-line total is not a bid.
Questions to ask on the first visit
A site visit is your chance to hear how the pro thinks. Good answers are specific, and vague answers tell you something too.
- What would you change about my layout, and why?
- Where will the gas, water, and power come from, and who does each hookup?
- Which materials do you recommend for my climate?
- What does your quote leave out?
- Who will be on site each day, and who is my contact?
- How long will the job take, and what could delay it?
- How do you handle changes once work starts?
- What does your warranty cover, and for how long?
Notice whether they ask you questions back. A pro who asks how you cook, how many people you host and what you want to keep simple is designing for you.
Reading the quote and contract
Read the paperwork slowly, and ask for anything unclear in writing. Several lines deserve extra attention.
Scope. It should list what is built, the materials, and which appliances. If a line says “per owner selection,” ask for the amount allowed.
Allowances. An allowance is a placeholder amount for something not yet chosen, like a countertop. A low allowance can push your final bill up later.
Payment schedule. Payments should tie to finished stages, not to calendar dates. Rules on deposits vary by state, so check with your state’s consumer protection office or a local attorney.
Change orders. Any change in scope, price, or schedule should be written down and signed before the work happens.
Timeline. Fixr says a project can take a weekend or a month, depending on design, so expect a start window and an estimated finish.
Warranty. Get the workmanship warranty in writing, and keep appliance warranties separate. Ask what you must do, such as annual sealing, to keep them valid.
Safety, permits and utilities
This is where a pro earns the money. Gas, power, and water mistakes are costly, and some are dangerous.
Call 811 before any digging, as Fixr advises, so underground lines are marked. Outdoor outlets need ground-fault circuit interrupters, and a larger kitchen may need its own circuit.
This Old House suggests putting the kitchen on a dedicated circuit that is easy to reach from your panel. It also notes that some areas require separate trenches for gas and electric lines.
Gas appliances in an enclosure need proper ventilation. Fixr warns that poor venting can let dangerous fumes build up.
If the kitchen sits on an elevated deck, Fixr recommends an engineer’s approval, since cabinets, stone, and people add a lot of weight. A pergola or roof over a grill raises its own clearance questions, so ask the pro about them.
Permits vary by town. This Old House notes that some places do not require them for a prefab grill island, and a permanent structure is more likely to draw an assessor’s attention.
Check your HOA rules too. Fixr suggests confirming codes with local officials and your association before you start.
None of this is legal or engineering advice. Your building department and licensed trades have the final word.
DIY or hire a pro?
Some people can do part of this themselves. Fixr groups the work by difficulty, and the split is useful.
Building from scratch takes the most skill. Assembling modular or stock cabinets suits a mid-level DIYer, and setting a pre-built unit is the easiest route for a beginner.
Even confident DIYers should hire help for utilities and for any elevated or structural work. A common middle path is to build the island yourself and bring in licensed trades for the hookups.
Hiring outdoor kitchen builders makes the most sense when the layout is large, the utilities are far away, or the kitchen is built into a roof or deck. It also helps if you want one party responsible for the finished result.
The cost of a mistake is the real question. A crooked tile is annoying, but a gas leak is not a place to learn.
Design decisions to settle before you call anyone
Walking in with a rough plan makes your bids easier to compare. It also stops a pro from filling gaps with their own preferences.
Location. This Old House suggests staying within about 15 to 20 feet of your indoor kitchen. That distance cuts trenching and keeps cooks close to the house.
Layout. Fixr lists L-shaped, U-shaped, linear, and galley layouts. Think about storage, appliances, seating, and how people will move.
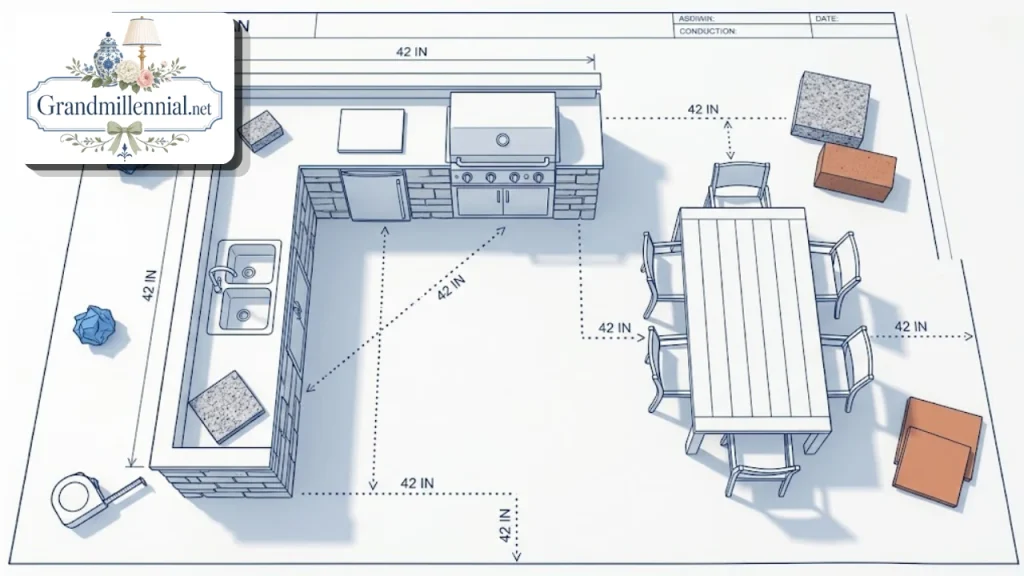
Clearance. This Old House recommends 42 inches between a table’s edge and any wall or obstruction, so chairs can pull out and people can pass.
Base materials. Cultured stone is lighter, brick is affordable and easy to maintain, and stucco is flameproof, according to This Old House.
Cabinets. Stainless steel, marine-grade polymer, and teak are the options it names. Teak needs a clear sealer every year.
Countertops. Granite resists staining and fading, while concrete needs annual sealing and is not a DIY job.
Winter plan. In cold climates, ask how the plumbing drains and how appliances are covered. A drain-down system makes shutdown easier.
Once the kitchen is built, the fun part is furnishing it. Our home decor ideas can help with seating, rugs and lighting, and our renovation tips cover planning the work around it.
Budgeting beyond the quote
A signed bid is not the whole budget. Plan for the things that sit outside the contract.
Furniture, lighting, a heat source, and shade often come separately. Fixr lists a small fire pit at 1,500 dollars and privacy fencing at 8 to 18 dollars per linear foot, which shows how fast extras add up.
Keep a cushion for surprises such as rock under the patio or a longer gas run. A cushion of 10 to 15 percent is a common rule of thumb, not a figure from the sources above.
If you plan to finance the project, talk to your lender before you sign. Fixr’s how-to guide suggests exactly that in its first step.
When you review bids from outdoor kitchen builders, add your own extras to each one. That keeps the comparison honest, because every bid will leave out something different.
Timing your project
Schedules differ by region and by season, so ask each pro about lead times instead of assuming. Busy builders may book out well ahead, and a slot that looks far away can be a sign of a good reputation.
Weather matters for concrete, mortar, and sealers. Ask how the crew handles rain delays and whether the quote assumes a particular start month.
Material orders can also set the pace. Custom stone, large appliances, and special cabinets may take time to arrive, so ask which items are long-lead and who places the order.
Get the expected start and finish in writing, along with what happens if either date slips. A calm conversation about timing at the start beats a frustrated one in the middle of the job.
Warranty and after-care
Ask what happens after the crew leaves. A good pro explains the maintenance your kitchen needs and puts the warranty in writing.
Concrete and teak need annual sealing, according to This Old House. Skipping it can shorten the life of the surface and may affect what a warranty covers.
Winterizing matters in cold regions. Before freezing weather, clean and cover the grill, unplug appliances, shut off water, and flush the pipes.
Appliance covers cost about 100 to 200 dollars each, per Fixr, and they protect the finish through the off-season. Keep every manual and receipt together.
Common mistakes homeowners make
Most problems start before the first shovel hits the ground. These are the ones to avoid.
Choosing a pro on price alone, without comparing what each bid includes.
Skipping the HOA or permit check, then facing a stop-work order or a redo.
Placing the kitchen far from the house without pricing the utility runs.
Using indoor-rated appliances, extension cords, or fixtures outdoors. This Old House advises UL-rated outdoor equipment.
Picking tile or grout that cannot handle freezing and thawing.
Paying most of the bill before the work is done.
Fixr’s advice for first-timers is to start simple and expand later. Quality materials beat a bigger footprint.
Red flags to take seriously
Most contractors are honest, but a few warning signs deserve attention. Be cautious when you see any of these.
Pressure to sign today to “lock in” a price.
A large upfront payment before any work or materials arrive.
No license number, or reluctance to share one.
A vague bid with no brands, models or materials.
Reluctance to provide references or show past work.
No mention of permits, or a suggestion to skip them.
A warranty that exists only as a spoken promise.
Pushing the biggest, most expensive setup without asking how you cook.
One red flag may be a misunderstanding. Several together are a reason to keep looking.
When comparing outdoor kitchen builders, the one who explains trade-offs and puts everything on paper is usually the safer bet. Price still matters, but it is not the only measure.
A simple path from first call to final walk-through
Here is a sequence that keeps the project on track.
Set a rough budget that covers the structure, appliances, utilities, labor, and permit fees.
Pick a location and gather basic photos and measurements.
Check HOA rules and call your building department.
Collect three bids and compare them line by line.
Vet your top choice using the checklist above.
Sign a detailed contract, and confirm the permit plan.
Inspect the work at each stage, and walk the finished kitchen with the builder.
During the walk-through, test the burners and outlets, and ask for a demonstration of winterizing. Keep manuals, warranty papers, and the contract in one folder.
Final thoughts
The right pro makes the whole project feel calmer. You get clear communication, a realistic schedule, and a kitchen that works in your climate.
Take your time with the shortlist. Spending a few weeks vetting outdoor kitchen builders is cheap compared with fixing a poor build.
Use the cost ranges as a rough guide, and remember that local bids will determine the final price. Ask questions, get things in writing, and let licensed trades handle gas, power, and water.
FAQs:
How much does hiring a pro for an outdoor kitchen cost?
Fixr reports a typical range of 6,000 to 30,000 dollars, with an average near 16,000. Smaller pre-made islands cost far less, and custom luxury builds can exceed 65,000 dollars. Local bids will decide your number.
How do I find a reliable builder near me?
Ask neighbors and local suppliers, then check licenses with your state or local board. Collect three itemized bids and call references on recent jobs. We do not rank specific companies.
Do I need a permit for an outdoor kitchen?
It depends on your town. Some places do not require permits for a prefab grill island, while permanent structures with gas, electric, or plumbing often do. Ask your building department and HOA before you start.
Can I install the gas line myself?
Fixr advises using a licensed contractor for gas, electrical, and plumbing work. A mistake can be dangerous, so leave these connections to licensed trades.
How far should the kitchen be from the house?
This Old House suggests keeping it within about 15 to 20 feet of your indoor kitchen. Closer placement cuts the cost of trenching utility lines.
How long does a project take?
Fixr says a project can take anywhere from a weekend to a month, depending on design. Ask your pro for a start window and an estimated finish in writing.
What is the cheapest way to get an outdoor kitchen?
A small pre-made island, a movable setup, or a propane grill avoids gas-line costs. This Old House notes that DIY work and cheaper materials also lower the price.
What should a contract include?
Look for an itemized scope, named materials and appliances, a payment schedule tied to stages, change-order rules, a timeline, and a written warranty. A local attorney can review it.